|
|
|
|
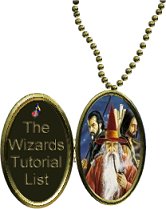
A Locket Tutorial
. A Little Note: The original tag was sent to a list I'm on so I asked the girl who made it if I could make a tutorial out of it and she said it was OK with her. (I am very sorry I don't remember her name though.) . 1) Open a new image 300X300 transparent. 2) Now using your shape tool 3) Now using the same shape make and identical shape outlined size 6 on the right side close to but not touching the first one. Leave a small space between them of about 5 pixels.
4) Using the select tool 5) Now Buttonize it or colorize it any way you want. Eyecandy inner bevel, blade pro or ulead web plugins would be the best in my opinion, make sure the solid side has a concave look to it. (indented).
6) Now deselect the shapes and using the magic wand 7) Open the picture you want to add to the locket now and copy it. (Ctrl + c) 8) Now paste it in to the selected area on the image we're working on. (Ctrl + shift + L) Deselect.
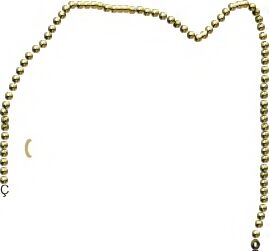
9) Now add a new layer and using your paint brush set on square size 5 make 4 little square's in a row going down then select them using the selection tool. Then using blade pro gold basic buttonize them. Then drag layer 3 over layer one and let go so it is in the first layer spot. 10) Now merge + merge visible. 11) Now using the text tool 12) Now add a chain by adding a new layer first, then
using the paint brush
13) Now merge + merge visible. 14) Now resize and go to Image + sharpen + sharpen, Then save as jpg.
Copyright © 2000 by GandlfDrgn, all rights reserved
|