|
 
Gun Rack Tutorial
Attached is a rifle tube. Download it before starting this tutorial.
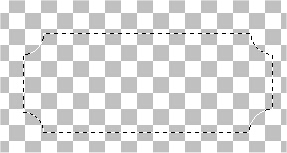
1) Open a new image 300X300 transparent 16 mil color.
2) Using the selection tool set on rectangle make a rectangle 250X100.
3) Now set the selection tool to circle and while holding the Ctrl key down and starting in one of the corners make a circle 40 pixels wide. This will cut the corner off. Repeat this to each corner.
This is what you should wined up with.
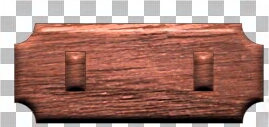
4) Now flood fill it in any color. Then go to image + effect + sculpture pick Mahogany or #13 set at 100, 13, 20, 0, 30, white, 315, 50, 30.
5) Now go to image + effects + inner bevel set at  , 10, 37, 12, 30, 21, white, 0, 43, 42.
6) Now add a new layer. Then using the selection tool set at rectangle make a rectangle 20X40 then flood fill any color.
7) Now go threw steps 4 and 5 doing the same to the new rectangle.
8) Now copy (Ctrl+C) the rectangle and paste it as a new layer (Ctrl +L). Then using the mover tool move each one onto the first rectangle about 50 pixels off each edge.
9) Now open the rifle tube that was attached and resize it to 70% then copy it (Ctrl +C) then go to the rack image and paste it as a new layer (Ctrl + L).
10) Now move the rifle layer under layers 2 and 3.
11) Now using the mover tool move it to where it looks like it is setting on the holders. Like
this:
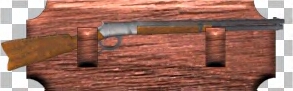
12) And Now go to Layer + mirage + mirage visible And your done.
13) Now add a new layer and fill it in a color or pattern then move that layer under the merged layer.
14) Now go to layer + merge + merge all (flatten). Then decorate as you would like.
15) Save it as a .jpg and your done.

Copyright © 2000 by GandlfDrgn,
all rights reserved
Tutorials By GandlfDrgn@AOL.com
This and all tutorials made by me are copyrighted and are the
sole property of GandlfDrgn. All graphics used in this tutorial
are property of there respective artist and I would like to give
them full credit and thanks. I give my permission to Ldy
Archrr aka Artists for PSP to place any and all tutorials
that I have made on her site.. this 18th day of October 2000. |
|